

Basics of Play
Roll the bones, the dark won't wait
Choose your heart and meet your fate
Evil stirs… it's growing loud
Go Forth, hero. Stand unbowed
Resolution
When you attempt something uncertain, roll a d20 and an Effort die.
- ◆ The d20 determines success.
- ◆ The Effort die determines impact.
Encounter Target Numbers (TN)
The GM sets a baseline TN for the scene:
| Very Easy | TN 10 |
| Easy | TN 10 + 1d4 |
| Common | TN 10 + 1d6 |
| Challenge | TN 10 + 1d8 |
| Extreme | TN 10 + 2d4, 2d6, or 2d8 |
| Doom | TN 10 + 2d12 |
Add your Attribute Modifier to the d20. The GM tells you which attribute applies to the action you're attempting.
Unique TNs
Specific creatures or hazards may have their own TN instead of using the Encounter TN. The GM calls these out when relevant.
Standard Encounter (TN 12), but the armored knight has Defense TN 15.
Easy vs Hard
Most rolls use your standard target number, but circumstances can make a roll Easy or Hard.
Lower the target number by 3
Raise the target number by 3
The GM calls for Easy or Hard based on the fiction. If you can justify why something should be easier, make your case.
- Easy and Hard do not stack
- They offset each other
When Rolls Are Easy
- ✓ You have the right equipment for the job
- ✓ An ally is directly helping you
- ✓ The environment favors your approach
- ✓ You've already attempted this and learned from the failure
When Rolls Are Hard
- ✗ You're attempting something risky or extraordinary
- ✗ The conditions are actively working against you
- ✗ You're pushing for bonus effects beyond the normal outcome
- ✗ You're distracted, wounded, or under pressure
Attributes
Your character has eight attributes representing natural capability:
Raw physical power and forceful actions, melee heavy weapons
Speed, balance, quick bodily reations, melee light weapons
Precision, control, and delicate or exact movements, ranged weapons
Awareness, intuition, and reading situations or people
Knowledge, analysis, and structured thinking, magical spell casting
Endurance, toughness, and pushing through physical strain
Personal impact, leadership, and emotional influence, divine spellcasting
Cunning communication, manipulation, and strategic persuasion
These eight stats define your character. They are your raw potential, not trained skills. When you roll, the GM calls the attribute you're going to use. These same attributes feed your three Defenses (Body, Mind, Soul), so what makes you capable also makes you hard to kill.
Checks, Effort & Contests
There are three types of rolls:
Checks
Binary. Can you do it or not? Roll d20 trying to beat the Target Number.
Effort
Used for things that take time (breaking a door, translating runes, killing a monster). You make a Check, then roll your Effort die to see how much progress you make.
Accumulate enough Effort against a Heart (10 points) to overcome it.
Contests
Two characters oppose each other. Both roll — higher total wins.
Checks ask "can you?" Effort asks "how long?" Contests ask "who wins?"
Roll vs Effort Bonus
Each attribute has two values:
- ◆ +Roll — Added to your d20
- ◆ +Effort — Added to your Effort die
By default, both equal your attribute score.
If you have Might +3, you have Might +3 Roll and Might +3 Effort.
Optional Customization
You may adjust bonuses within the same attribute. For each point you reduce one value, increase the other by the same amount.
- Might +3 → +2 Roll / +4 Effort
- Reason +2 → +3 Roll / +1 Effort
- Neither Roll nor Effort can exceed +5 at first level.
- If you have a -1 Attribute, you must reduce both Roll and Effort by 1.
When you make a roll, the GM tells you which attribute applies. You add your +Roll bonus to the d20 and your +Effort bonus to the Effort die.
Actions
On your turn, you get 1 Action and 1 Move.
Basic Actions
Attacking
You attack with a ranged weapon (d8 Effort die) and have Finesse +3.
- 1 Declare the attack (must have Line of Sight).
- 2 Roll both dice (d20 + d8 Effort).
-
3
If you hit: Add your Effort modifier to the Effort die. (If you rolled a 5 you would add +3 for total of 8)
-
4
If you miss: You Graze, dealing your Effort modifier in damage (+3 for this example) — or you may spend Momentum.
- 5 Subtract your Effort from the target's current Heart.
Turns & Order
Combat is organized into Rounds. Each Round, every character and enemy takes a Turn.
Initiative Options
Round the Table
Go clockwise from the GM's left. The GM slots enemies as desired (all at the end, split halfway, or woven between players). Keep it moving.
The Zipper
- ◆ Players choose who goes first
- ◆ After a player acts, a monster/group acts
- ◆ Then another player
- ◆ Continue alternating until all have acted
- ◆ Start a new Round
Which side goes first is determined by a Notice Check.
Momentum
"You feel it, don't you? That surge before you strike. That calm before you speak. Power is not a river you dam… it is a tide you ride. It swells, it recedes, it swells again. The fool fights it. The master moves with it. Stop trying to hold it. Learn the rhythm of your own spirit, and you will never be without strength when strength is needed."
— Sethro Kaan, Sage of the Quiet Hand
Momentum is your engine.
Momentum represents everything that keeps you in the fight; your stamina, your power, your focus, your will to push forward. It's not just health. It's not just mana. It's both, woven together. The same resource that keeps you standing fuels your greatest abilities. Spend too freely and you leave yourselfexposed. Hoard it and you'll never reach your potential.
Every hero must learn this balance. Momentum is how you stayalive, how you power your gambits, how you seize control when the odds turn against you. Master it, and you'll always have one more trick when it matters most. Ignore it, and the tide will drag you under.
Momentum Pool
You start with 3 Momentum dice (d6s). You gain more as your Vigor increases.
Momentum dice exist in three areas:
Your reserve. Starting place for all dice.
Active fuel, ready to spend.
Exhausted, burned out.
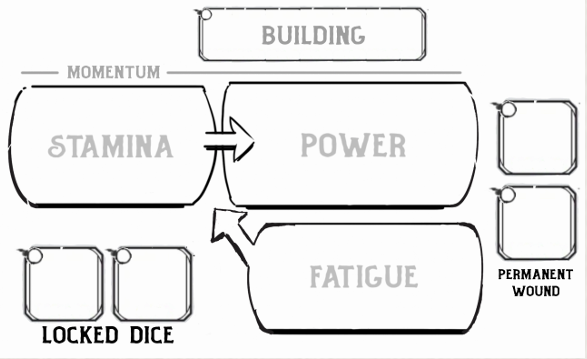
Stamina → Power → Fatigue → back to Stamina
Where your dice sit determines what you can do.
Momentum starts in Stamina, your reserve. It flows into Power when you build up, drops into Fatigue when you take hits or burn out, and eventually cycles back to Stamina.
Sometimes you move it. Sometimes the world moves it for you. Where your dice sit determines what's possible.
Preparing
At the start of your turn, you Prepare by moving 1 Momentum die:
- ◆ Stamina → Power (building energy)
- ◆ Fatigue → Stamina (recovering)
Spending Momentum
You may spend Momentum during your turn. There is no limit except what you have available and your action economy (1 Action, 1 Move).
Stamina lets you:
- ◆ Boost a Roll — Roll the die and add it to your Check
- ◆ Fuel Gambits — Discplines that require Stamina as fuel.
Power lets you:
- ◆ Boost a Roll — Add to Check or Effort
- ◆ Fuel Gambits — Discplines that require Power or Stamina as fuel.
- ◆ Extra Action — 1 Momentum = 1 additional Action
- ◆ Increase Defense — Lock and roll 1 Momentum, it increases all Defenses until you've been attacked, and then it is Spent.
- ◆ Build — Place Momentum into the Building pool for allies to access
Power is Stamina with potency. Use it wisely
Locking Momentum
Some abilities require you to Lock Momentum.
- ◆ Move a die into a Locked slot
- ◆ It remains there while the effect persists
- ◆ You cannot use it
- ◆ On your turn, you can opt to remove it, or replace it with a new Lock ability you've activated
- ◆ If you take a Hit, you may move it to Fatigue (ending the effect)
You begin with 1 Lock slot. Discplines will open additional Lock slots.
Hits & Beats
When you take a Hit, move 1 Momentum die into Fatigue.
It can come from:
If all Momentum is already in Fatigue when you take a Hit → you trigger a Beat.
Beats
Beats represent pivotal shifts in the encounter. They may:
- ◆ Knock you out (and cause a Wound)
- ◆ Advance timers
- ◆ Activate enemy abilities
- ◆ Grant GM Pressure
- ◆ Escalate the scene
The GM defines what Beats mean at the start of the encounter. Not all Beats lead to being Knocked Out. They are narrative ways that change the stakes of a scene.
Wounds
When Knocked Out, you roll for Severity:
1d20 + the two attributes tied to the Defense that dropped you
- Body: Might + Agility
- Mind: Instinct + Reason
- Soul: Presence + Vigor
Already wounded? Each existing Wound gives a -5 penalty on your Severity roll. Two Wounds? That's -10 penalty. The more broken you are, the harder you fall.
Severity Table
| -6 or less | Death (at end of encounter) |
| -6 to 0 | Permanent Wound (Some Miracle, specific quest, or Powerful NPC can cure it) |
| 1 – 5 | Vicious Wound (d4 sessions) |
| 6 – 15 | Shallow Wound (Reason check or Long Rest) |
| 16+ | Flesh Wound (Reason check or End of Encounter) |
Determining the Wound
Roll d8 on the matching Defense chart.
Body
Mind
Soul
Narrate It
You and the GM describe what happened. Broken rib? Deep gash? Concussion? Give it a name. This Injury Aspect lives in the fiction. The GM can invoke it when it matters, and so can you.
Recovery
Wounds have timers. Check the duration to know when it fades. Some need rest. Some need a healer. Some need time and safety.
Short Rest
After every Encounter:
- ◆ Move all Momentum to Stamina
- ◆ Flesh Wounds disappear
Long Rest
24 hours of uninterrupted downtime.
- ◆ Remove a Shallow Wound
Magic and abilities may accelerate healing.
It is possible that the GM can string Encounters together without Short Rests between them.
Boost Example
You're attacking an enemy with your ranged weapon with a d8 Effort die and a Finesse of +3 giving a +3 to roll and +3 to effort.
Scenario: A
- 1 Declare the attack (must have Line of Sight).
- 2 Roll both dice (TN is 13 and your Skill Die result is 9, and your Effort die rolls a 6).
-
3
Your Could Graze: But you might want to suceed so you could do 9 effort (Effort + Mod) instead of just your Modifier (+3)
-
4
Roll and Fatigue Stamina or Power: You roll Momentum, and get a 4.
- 5 Apply the Momentum result to the Skill Die: Add 4 to the d20 (9) to get 13. Success! Effort is 6 damage + 3 Modifier
- 5 Apply Effort You hit the enemy for 9 Effort.
Scenario: B
- 1 Declare the attack (must have Line of Sight).
- 2 Roll both dice (TN is 13 and your Skill Die result is 13, and your Effort die rolls a 3).
-
3
Your already Succeeded, but aren't doing much Effort: Your effort will be 6 (3+Modifier of 3) but you want to do more!
-
4
Roll and Fatigue Stamina or Power: You roll Momentum, and get a 4.
- 5 Apply the Momentum result to the Effort Die: Add 4 to to Effort. Success! 3 Effort + 3 Modifier + 4 Momentum = 10 Effort
- 5 Apply Effort: You hit the enemy for 10 Effort.
This is where heroes shine. But every die you spend is one less standing between you and Fatigue. Push too hard, and when that next Hit lands, you're eating a Wound or triggering a Beat.
Building
On your turn, you may push any number of Power dice into Building. These are no longer yours.
- ◆ Allies may use them like Power dice (after which they are returned to your Fatigue)
- ◆ They cannot Lock them
- ◆ If unused when your turn returns, they move to your Fatigue
This is how you set up the rogue's killing blow. How you fuel the mage's big moment. Momentum isn't just personal, it's shared. A team that builds together hits harder than any solo hero ever could.
Combat
"Stop thinking about glory. Keep moving. Hesitate and you're dead. Rush in blind and you're dead faster…"
— Cap. Harren Voss, Blackwall Company
This is where plans fall apart and instincts take over. Combat isn't a math problem, it's a conversation between steel, ink will, and chaos. Every round is a question: press the advantage or fall back? Protect your ally or trust them to hold? Spend everything on one glorious strike or keep something in reserve? The answers change moment to moment. The wrong call gets people killed.
Encounters are more than monsters with stat blocks. They're pressure. Timers ticking down. Terrain that helps or hurts. Enemies that think and exploit your mistakes. Victory doesn't go to the strongest....it goes to the team that moves together and strikes when the iron's hot. Hesitation is a knife in your ribs. Recklessness is a shallow grave. Find the line between them and walk it.
Advanced Actions
These actions are for the Heroes who need to adapt more. The one who sees the whole battlefield, not just the enemy in front of them. Sometimes the best move isn't an attack. It can be buying time, setting up an ally, or getting the hell out of a bad spot.
Line of Sight & Cover
To attack, you need Line of Sight.
With Grid
Trace a corner-to-corner line.
- ◆ Clear line to all 4 corners of an enemies spot from one of your corners = Line of Sight
- ◆ Clear line to less than all 4 corners of an enemies spot from one of your corners = Cover
- ◆ Solid block = No Line of Sight
Without Grid
Trace from center to target.
If the line touches any part of them, you have Line of Sight. If it can't touch all parts of them (something, or a hostile, blocks part of their position), they have Cover.
Attacks vs Cover are Hard.
Movement
Distance Bands:
Move shifts one band.
- Engaged — Right next to them. In their face. This matters—certain abilities and enemy actions trigger when you're Engaged.
- Close — A few steps away. Same general area.
- Nearby — Across the room. Reachable with effort.
- Far — Edge of the battlefield. You'll need to commit to get there.
Grid Play
Move = 4 + Agility squares.
- Engaged = adjacent
- Close ≈ 6 squares
- Nearby ≈ 12 squares
You may split movement around your Action.
Action & Movement:
Stay Close? Move and act in any order. You're just repositioning within the same space.
Push to Nearby? That's your Move. You can take an Action beforeor after, but your move is done.
Going Far? That's two Moves. Your Action is spent getting there.
Grid Play: If you're using hexes or squares, you can split your Move around your Action. Move some, act, move the rest.
Reactions
You get 1 Reaction per Round.
Every Reaction has a trigger. Something that lets you act outside your turn. Some are specific ("when a Close ally takes a Hit"). Some are broader ("during the round"). When the trigger happens, you decide: spend your Reaction or hold it for something else.
Free Reactions ignore this limit.
You won't have Reactions yet, they come from Gambits tied to your Disciplines, starting at 2nd level. But you need to understand this now: Reactions are part of the Round's rhythm. Know your triggers. Know your window. Don't waste it on something small when something big is coming.
Effort
Effort measures progress. Damage in combat is Effort. So is chipping away at a locked door, decoding ancient runes, or convincing a hostile crowd to hear you out.
| Bare hands | d4 |
| Weapon / Tool | d6 |
| Gambits | Modify further |
Hearts
Each Heart = 10 Effort
- ◆ 3 Hearts = 30 Effort
- ◆ You target only 1 Heart at a time
- ◆ Excess Effort beyond 10 is wasted unless specified (Overflow or Overkill Gambits)
Variations
Conditions
Conditions represent temporary states that alter your capabilities. They come in pairs (positive and negative) and are applied by abilities, environmental hazards, or the GM based on the fiction.
You can carry multiple conditions at once; Empowered and Protected, Weakened and Trapped. Stack away.
But paired conditions cancel out. Empowered meets Weakened? Both gone. Focused meets Dazed? Wiped clean. Opposites don't coexist.
| Bolstered | / | Shaken |
| Empowered | / | Weakened |
| Focused | / | Dazed |
| Mobile | / | Trapped |
Duration varies. Some conditions last until the situation changes—leave the fire, lose the burning. Others stick until an enemy's effect ends or you shake it off with a Saving Throw. The GM will tell you what it takes to break free.
Conditions can stack. Opposites cancel out.
Positive Conditions
- Bolstered — Soul Defense +3, All Social checks are Easy, Gain 1 temporary Momentum
- Empowered — Body Defense +3, All Physical checks Easy
- Focused — Mind Defense +3, All Mental checks Easy, 2nd Lock slot becomes active
- Mobile — Double Move
Negative Conditions
- Shaken — Soul Defense -3, All Social checks are Hard, Lose 1 Momentum temporarily
- Weakened — Body Defense -3, All Physical checks are Hard
- Dazed — Mind Defense -3, All Mental checks are Hard, Can't use Lock slot
- Trapped — Cannot Move
Rules vs Ruling
Conditions are Rules. They're defined states with consistent mechanics that everyone at the table already knows. When the GM says "you're Weakened," nothing needs explaining.
But not everything that happens in fiction needs a condition. The GM can call any check or action Easy or Hard in response to what's happening at the table. No condition applied, no token placed, no duration to track. Smoke in the room makes ranged attacks Hard. High ground makes you easier to hit. A slick floor makes movement treacherous. These are Rulings: real-time calls that reflect the fiction without adding anything to track
Rulings don't stack up between sessions. They don't need to. They exist in the moment, they shape the moment, and then they're gone. Conditions are what you write down. Rulings are what the GM says out loud.
Modifiers
When multiple sources give you a bonus or penalty to the same thing (a Defense, a roll, Effort) you don't add them together. You take the highest and move on. Two abilities both granting +3 Body Defense? You have +3 Body Defense, not +6. The GM offering a +2 to your roll while you're already getting +3 from a condition? You have +3.
Easy and Hard work differently. They're not numbers, they're states. Easy or Hard on a check can sit on top of any Modifieryou're already receiving. You can have +3 to your attack and still have your attack roll be Easy. These don't compete with each other because they're doing different things.
When in doubt: Modifiers cap at the highest source. Easy and Hard always apply
Debuffs
Monsters don't use the condition system. When heroes impose effects on monsters, those effects are called Debuffs.
Debuffs can combine. A grappled monster might be Exposed and Pinned at the same time. A creature reeling from a devastating hit might be Rattled and Staggered. Special abilities may introduce additional effects beyond these five, but this list covers the core tactical vocabulary for every encounter